 Done Digital
If you’re using WordPress and WooCommerce to power your online store, customising “Add to Cart” functionality can greatly enhance the user experience and streamline the checkout flow. As a marketing consultant who specialises in WordPress website and WooCommerce stores, I have found myself ‘googling’ the term “Custom Add to Cart URLs” more times than I can count. It’s a fantastic feature that I frequently use in my own businesses, as well as on my clients’ websites.
That’s why I wanted to share it on the Done Digital blog and provide you with a simple but comprehensive guide to custom add to cart links. I’ll walk you through the exact process of creating your custom WooCommerce links and buttons that you can customise to suit your specific needs and use case cases. Whether you’re dealing with simple products, variable products, or grouped products, these custom links allow you to effortlessly add products to the cart, redirect customers to specific pages, and even set custom quantities—all using simple URLs.
While there are many use cases for custom URLs inn various contexts, in this article, I’ll just focus on custom add-to-cart URLs for your WooCommerce store. So, let’s dive right in!
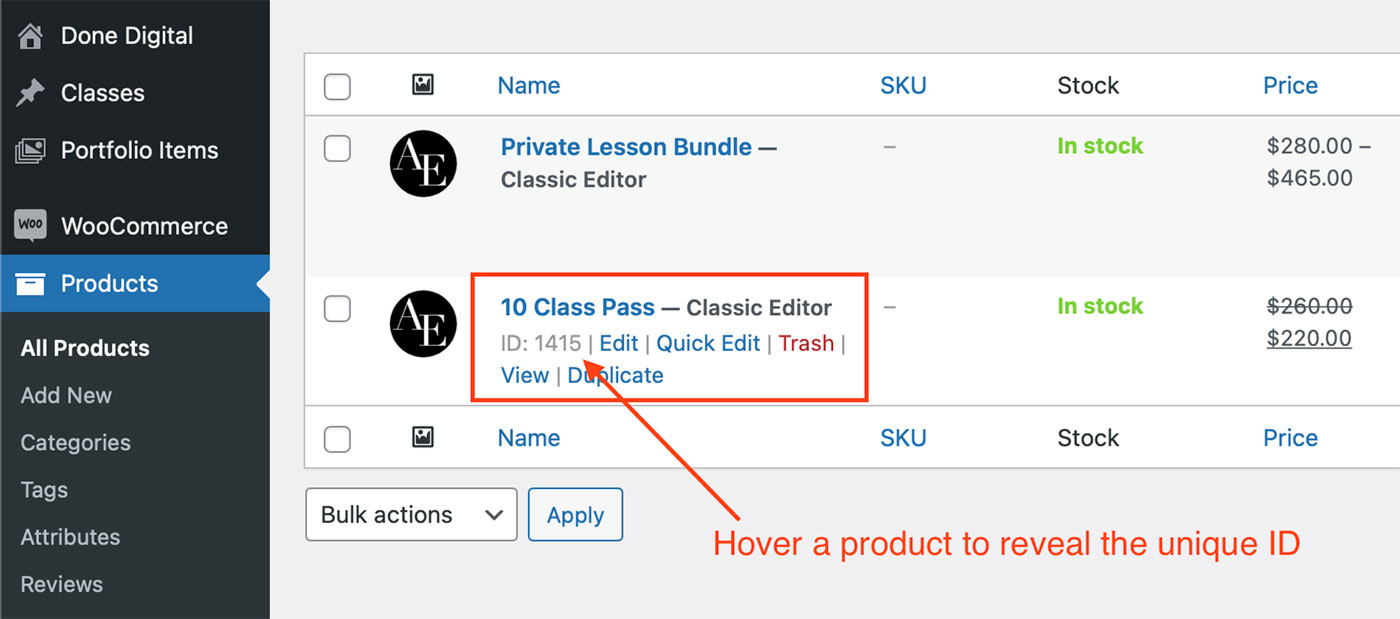
Where to Find Product IDs in WooCommerce
In order to create your custom URLs, you’ll need the unique product IDs of the products you want to include in the link. Here’s where to easily locate your product IDs in WooCommerce.
Adding Simple Products to Cart with Custom WooCommerce Links
With simple products, adding them to the cart via a custom URL is a breeze. Here’s how to generate the URLs and specify quantities. Whether you want to redirect customers to the cart, checkout, or any other page, you’ll have full control over the customer journey.
Let’s look at some practical examples:
Custom URL to Add a Simple Product to Cart
This is great if you want to place a simple add-to-cart button or link anywhere on your website:
https://yourwebsite.com/?add-to-cart=25&quantity=1
URL to Add 2 of the Same Simple Products to Cart
You can change the quantity add the end of your URL to control how many items of that same product are added to the cart:
https://yourwebsite.com/?add-to-cart=25&quantity=2
Add a Simple Product to Cart and Send the User Directly to The Cart Page
In some instances, you might want to send the user to the cart page after the product is added. Here’s how to do just that:
https://yourwebsite.com/cart/?add-to-cart=25&quantity=1
Send the User Directly to Checkout After Adding a Simple Product to Cart
This is probably the custom URL I personally use the most. This is great if you want to make sales from a landing page or any other page for that matter. By having users land straight on the checkout page after clicking the “Buy Now” button, you eliminate all friction and increase your conversion rates. Here’s how to build your custom URL:
https://yourwebsite.com/checkout/?add-to-cart=25&quantity=1
Redirect to Any Page After Adding a Simple Product to The Cart
You can further customise the above example and send users to any specific page after adding a product to their cart. This could be to up-sell items, have them register an account or to collect other important information before sending them to checkout.
https://yourwebsite.com/any-page/?add-to-cart=25&quantity=1
The above examples of custom WooCommerce URLs allow for incredible flexibility when it comes to designing your online buying journey and I have personally used them on many of my clients’ websites.
How to Add Variable Products to Cart Using Custom WooCommerce URLs
Variable products may have different variations, but they function in the same way simple products do. What’s important is that you use the correct product ID. In the case of variable products, we will be using the ID of the product variation, rather than the product itself. This allows you to craft custom URLs that add the desired product variation to the cart without having to navigate to the product page.
Just like in the examples above, you can still set quantities and redirect customers to different pages based on your desired outcome and customer journey.
Once again, we’ll use some practical examples that will make it easier to adapt these custom links to your website:
Add One Variable Product to Cart
https://yourwebsite.com/?add-to-cart=88&quantity=1
Add 2 or More of The Same Variable Product to Cart
https://yourwebsite.com/?add-to-cart=88&quantity=2
Change the quantity at the end of the URL to suit your needs.
Add One Variable Product to Cart & Redirect to Cart Page
https://yourwebsite.com/cart/?add-to-cart=88&quantity=1
Add One Variable Product to Cart & Redirect to Checkout Page
https://yourwebsite.com/checkout/?add-to-cart=88&quantity=1
Add One Variable Product to Cart & Redirect to Any Page
https://yourwebsite.com/any-page/?add-to-cart=88&quantity=1
If you are using variable products on your websites, these custom URLs can come in handy in streamlining your checkout process and enhancing the user experience. Depending on the WordPress theme you use, the generic product pages can be lacking quite a bit. These custom WooCommerce product links allow you to design your sales page exactly the way you want and send buyers directly to the checkout page.
Adding Grouped Products to Cart Using Custom Add-To-Cart URLs in WooCommerce
Next, let’s look at how to add grouped products to the cart, along with specific quantities for each sub-product. This feature allows you to create custom bundles and offer flexible purchasing options to your customers.
Add a Grouped Product to Cart
To create a custom URL for adding a grouped product to the cart in WooCommerce, you will need to retrieve the Grouped Product ID and the corresponding sub-product IDs. Let’s take an example:
https://yourwebsite.com/?add-to-cart=9876&quantity[5432]=3&quantity[6543]=2
In this scenario, the Grouped Product ID is 9876, and we are adding 3 units of the product with ID 5432 and 2 units of the product with ID 6543.
It’s important to remember that if you wish to add “zero” as the quantity for any of the sub-products, you still need to specify it explicitly. For instance, to add zero units of the product with ID 6543, you would simply use &quantity[6543]=0 in the URL.
Just ensure to replace “yourwebsite.com” with your actual domain name and adjust the product and quantity values based on your specific products and requirements.
And there you have it! By harnessing the power of custom WooCommerce Add to Cart URLs, you can significantly enhance the shopping experience on your WordPress website. Whether you’re a small local business selling a few items online or a large e-commerce store, custom checkout URLs empower you to create seamless customer journeys, increase conversions, and provide a user-friendly buying process that keeps your customers coming back.
What’s your experience with WordPress and WooCommerce? Have you used custom URLs on your website to enhance the checkout flow? Let me know in the comments below!
 Done Digital